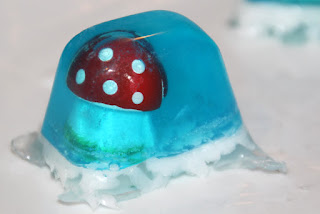
Mine are NO where near as cute as hers and we had to overcome a lot of little mishaps along the way but in the end most of them turned out OK.
I bought a soap making kit at Value Village for $5.99 shortly after I saw the post mentioned above which was my source of inspiration.
This kit had scents and colours included but no clear glycerin soap so I bought a chunk from Micheal's with a 40% off one item coupon.
 |
| Getting ready to start making our soap |
Second mishap...discovering our ice cube trays are really small (that or they toys I randomly grabbed to use now since I can't find the other bag are just too big)!!!
We started by grating some white soap. I did this first as in the tutorial I read it sounded like a wise idea to have this all ready to go.
The tutorial didn't mention how much soap to melt so I guesses and melted 8 one inch squares of the clear glycerin soap in a Pyrex measuring cup in the microwave. I let it go for 40 seconds at first, stirred it and then melted on 15 second intervals and stirred each time. I only had to do that twice.
After the soap is melted it's time to add the soap dye. I neglected to check the colours of the soap dye in my kit previous to starting tonights activity. As it turned out I had no blue all I had was green and red.
Third mishap...no blue dye :(
At the last minute I decided I really wanted them blue so I added a drop of food colouring instead...too big of a drop as they are really blue! Fourth mishap. I am hoping the food colouring doesn't affect the soap or dye skin :(
I did get lucky and have peppermint scents and added some in with the colouring and stirred until I had an even colour.
Next it was time to pour the melted soap into our ice cube tray. Be sure to leave about a 1/4 inch space in each compartment as you need to add the toys and have room for the shavings and top coat. I was only able to fill 11 of the trays compartments with soap before I ran out...Fifth mishap.
Next the girls placed the small toys (which were really too big for our small tray...6th mishap) into each compartment after the soap was just beginning to solidify. You have to do this quick as once it starts to solidify (approx 3 minutes) it continued hardening very fast. Make sure you put your toys in upside down as the top of the tray will actually be the bottom of your soap.
 |
| Alot of our toys stick out as they were too big for our tiny trays |
Next I melted 3 more 1 inch squares and poured a thin layer over the whole tray as a top coat. This holds the grated soap in place.
When the top coat was evenly spread over the tray I popped it in the freezer for about 20 minutes. Make sure not to remove it until the soap is cold to the touch.When solid, I gave the tray a little twist and popedp out the soaps. Easy peasy :)
Here are some of our soaps. I still need to carve the edges a bit to clean up the rough edges and then wrap them. I plan to do them in clear cellophane so they will be visible through the packaging. We will tie them onto the top of packages as a nice little decoration.
Most of our trinkets inside are lopsided (7th mishap) but for a first attempt they came out OK. Next time...I'll be more prepared and make certain I have everything organized before starting the activity...but we will definitely be making more soap soon!


Super cute! I'm pinning this for later might use these for birthday party favors.
ReplyDeleteLooks good to me! I think all the imperfections add to the charm. These would make fun gifts for kids (at least mine). They would want a bath all the time!
ReplyDeleteHow fun! My kids would love that soap!
ReplyDeleteThanks for your comment at Reading Confetti!
These look great and fun to make, thanks for sharing. Just hopped from TGIF linky.
ReplyDeleteEllie
I love those! My girls would have so much fun making, giving, (and using) soaps like that. Now I might have to wait a year and make those next Christmas :)...
ReplyDeletethese are super cute! I made these last year for gifts for my sunday school kids. But...I couldn't find the clear soap and they turned out terrible! These are sooo cute! Thanks for linking them up at Hating Martha!
ReplyDeleteThis is AMAZING!! What a creative fun idea & it turned out looking so cute!! LOVE it!! Thanks for linking up to TGIF!! Merry Christmas,
ReplyDeleteBeth =-)
such a cute idea!!
ReplyDeleteThanks for linking up to Serenity Saturday Link Party, hope to see you there again this week
Natasha xx
http://serenityyou.blogspot.com/search/label/Serenity%20Saturday