Followers

Showing posts with label storage. Show all posts

Friday, February 7, 2014

Got Craft Clutter? Try these storage solutions


I don't know about you but my craft room always seems to be disorganized. Everything is always everywhere and never put away properly. That is partly because everything doesn't have it's own place. I need to do some organizing and found some wonderful craft room storage solutions for inspiration.

As always click on the picture and it will take you to the source post for details of all the ideas.

This is a must do for me. I love the look of this tray and its easy access to all your favourite tools.
http://www.bhg.com/decorating/storage/craft-room/quick-clever-ideas-for-organizing-crafts-supplies/

 I have been dreaming of a rubber stamp storage similar to this for a long time. I love that it uses otherwise wasted space and I have the perfect area for it in my craft room.
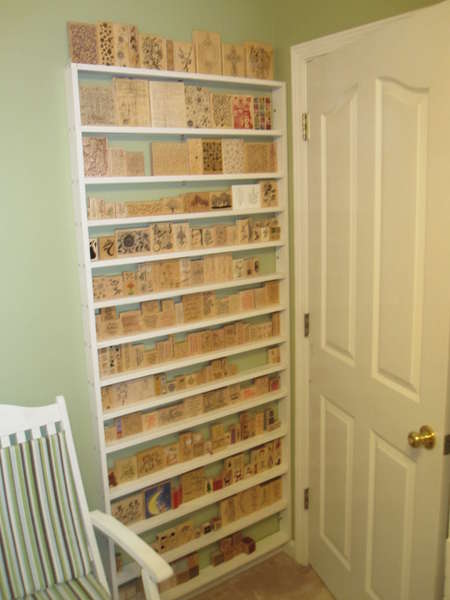
http://www.scrapbook.com/gallery/?m=image&id=2797075&type=scraproom&r=1&start=640

Hang lace on vintage rulers (or ribbon scraps). This hanging idea would be great for clear rubber stamps too.
http://mamiejanes.blogspot.ca/2011/07/welcome-to-my-studio.html

Sweet scissor storage. I recently found one of those white dishes at the thrift store now I just need to find the inner flower frog.
http://meari.blogspot.ca/2011/05/flower-frog-scissor-frog-what.html

Mason jars on the bottom of a shelf. I like how this one has larger jars in the back and smaller ones in the front so you can still see each jar in the back.
http://www.poofycheeks.com/2012/08/mason-jar-storage-shelf-tutorial.html

Ribbon storage. This blog post tells why she went from the pink version to the white version pictured below.
http://www.craftytexasgirls.com/2013/01/organized-craft-room.html?m=1

I love the idea to keep various craft items like markers and crayons in clear glass storage. This way they are easy to see and find what you need. As a bonus it looks oh so pretty.
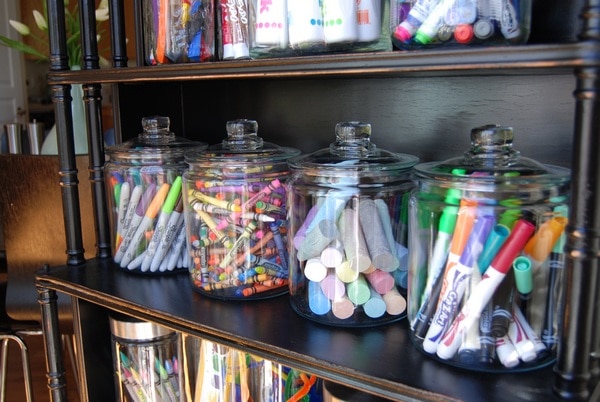
http://www.raisinglemons.com/parenting/out-of-sight/

DIY to make a cake stand to display your favourite accents for easy access.
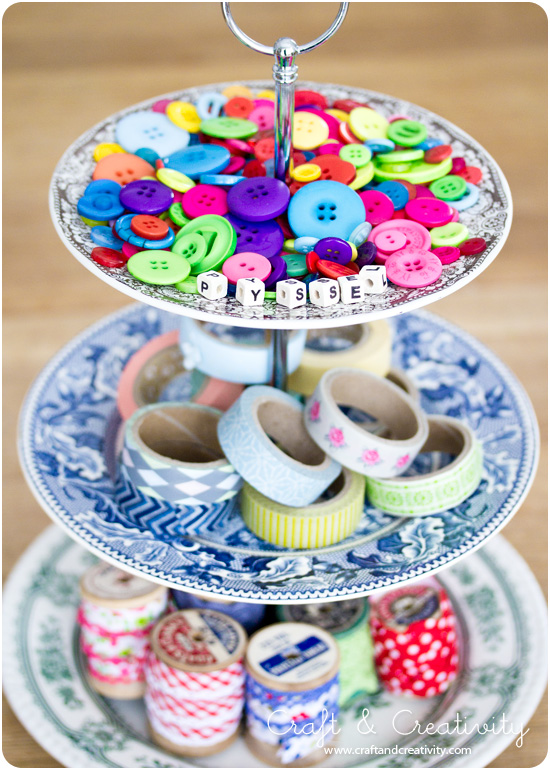
http://craftandcreativity.com/blog/2013/02/13/makeyourowncakestand/


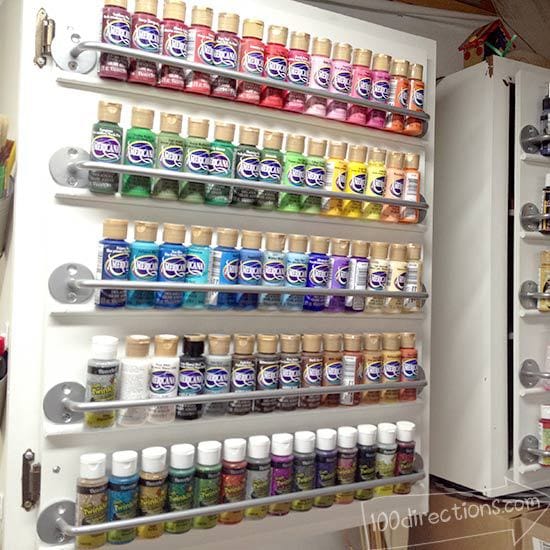
These rods are great for organizing craft paint and paper punches on the back of a cabinet or regular door.
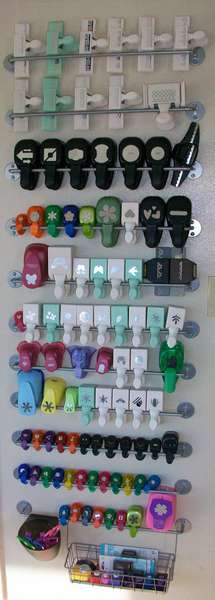
http://www.scrapbook.com/gallery/image/scraproom/2995985.htmlhttp://www.100directions.com/organize-craft-paint-on-a-cabinet-door/


Ink pad storage! This is a DIY to make the shelf yourself but an old cassette holder from a thrift store painted up would work too. I have one waiting to be painted :)
http://didyoustamptoday.blogspot.ca/2010/05/guest-blogger-learn-how-to-build-your.html

Use a spice rack for embellishments such as buttons, googly eyes, gems... the possibilities are endless.
http://followpics.net/spice-rack-turned-button-holder-yes-we-must-make-this-this-is-great-for-organizing-googly-eyes-small-embellishments-buttons-snaps-and-so-cute-me-wuvs-flowers/

Glitter glue or fabric paint storage in on old scissors lazy susan.

http://craftstorageideas.com/incredibly-organized-miss-nicky-part-two/
An under mounted baking sheet on the bottom of a shelf works great too and it frees up table space.
http://wecanbeaoriginal.com/blog/2011/07/beaorganized-glitter-glue/


Here is a DIY for an easy to make sticker storage idea from a shoe box.
http://www.kindercrazeblog.com/2012/06/stickers-organized.html

Yarn, twine, or ribbon storage in mason jars...another must do for my favourite red and white twine.
http://www.giverslog.com/?p=743

If that isn't enough craft room organization ideas for you, click here to see 44 craft room tours!

Also here is another collection of 50 ideas for storing kids supplies. Lots of great ideas! Not all are craft supplies but still a great list.
http://www.attemptingaloha.com/2012/01/think-outside-toy-box-over-50.html

Which idea did you like best? Do you have another idea to share?

Saturday, May 2, 2009

Recycled frame art gallery

Is your fridge cluttered with art projects that get knocked down everytime you walk by, open or close the fridge or due to little hands exploring? Well I have the solution for you!

Make a Art Gallery from recycled frames!

Supplies you'll need:
Some old pictures frames in varying sizes and shapes
Paint (I sprayed mine)
Sand paper
Picture hangers that mount directly to frame
Screws and sinkers and screw driver (or small finishing nails and hammer if you would rather)
Small clips (paper clips that clamp, or scrapbooking/craft clips)

I went to the thrift store to find some old frames. Sometimes they sell them even cheaper without the glass so take a look around. I paid $8 for the 5 I used.

Simple How To:

Collect some frames and remove the picture, glass and backing and recycle it. (I saved the glass from the two of mine that had glass for another project, and recycled the cardboard backings and prints, and removed and saved the wire hanger for future use)
(Aayla helped me sand the frames... isn't she just picture perfect?)

Next give all the frames a light sanding. Hang somewhere and spray paint your choice of colours. All the frames in our home are black so I did black for these too.

Decide how you want your frames laid out on the wall. (You may want to think of this before you go shopping for frames, as I just grabbed the 5 cheapest frames and didn't think about the layout until I was ready to hang and I am not totally happy with the end result. All I knew was I wanted a large one to display full size paintings)

Attach picture hangers that rest on a nail head to the top side of the back of your frames.

After your frames are hung on your wall, collect your 5 clips. I used scrapbooking ones I had on hand which had holes on them. We then put sinkers in the wall near the top of the frame and screwed the clip directly to the wall. Screwing the clips in with sinkers allows them to be sturdier when changing the art work around. (This step could be simplified with a finishing nail and office type paper clips just hung on the nail)


Now comes the hard part, choosing which master pieces to add to the art gallery. (I also added in a couple rewards Sierra got at daycare. She has had a rough couple of weeks coming down off of her Easter chocolate high, so receiving these rewards was a great accomplishment! She has been a monster!!!)

I did this while Sierra was at daycare and she was so excited to come home and see her art on the wall. It was magical! Now our fridge is neater, art work is safe and our little ones feel great pride in seeing their work in frames!

Where I got my inspiration from:
Lets Explore

Sunday, March 22, 2009

Is it a bed? Is it a fort?

This weekend I was supposed to be organizing my craft room...however Sierra has had a mischievious weekend and I didn't get much time in my room at all. We instead, went to IKEA. What did we buy?
Is it a bed?

Is it a fort?

Nope it was toy storage organization!

We have a little alcove in our kitchen which is the girls main play area. (We spend most of time in this one kitchen/living/play room. It's the hub of our home) I should have taken a before shot but really it was too embarrassing to. The wall where the storage unit is was littered with bins and bags of toys and then more loose toys scattered all over the floor. Nothing really worked but throwing toys in piles. I was tired of the mess and wanted a better way to promote clean up time effectively.

It's only day one but so far so good! Sierra enjoys looking for the bins to put the toys away properly. She has a bad habit of throwing toys and books so we are hoping this will help promote respect with how we treat our belongings!

I will be taking photos of groups of toys that belong in each bin too so they can see at a glance which toy belongs where without pulling out the bins. I'll try to remember to edit this to add in the completed look when I get the photos done :)

We have books in almost every room in our home. I tried to organize these ones in rainbow colours as seen here. I love the look of her bookshelf. Upon trying to do this myself I realized that most of our book spines are white, but we did manage to get a few lined up here.

Today we also went to the Richmond Nature Park since we were in the area after visiting IKEA. As mentioned earlier Sierra was not in the greatest of moods today and she didn't want to walk so her and Aayla stayed in the stroller. I also didn't have my good camera with me so we didn't get any pictures of the birds as they were too far away.

They both enjoyed the nature house at the park though. It's a neat little place with lots of information there. It's set up to learn through play there with live tanks with snakes, newts and frogs. (They do an animal exploration time, as well as guided tours at the park certain days.) Sierra and Aayla liked playing with the frog game which was set up as Tic Tac Toad! There were puzzles to do, microscopes to explore, bees to watch, stamps of animal tracks, games, fun facts everywhere, taxidermied animals, a mini movie and more!

A couple pics of them having fun at the nature house.


So if you live near us I recommend a trip the the Richmond Nature Park. It's a great stroller path however I would recommend an All Terrain Stroller trail as there are some bumps along the path. Don't forget to stop by the nature house too!